How to Create, Manage, and Submit Organization Orders
One of your primary responsibilities as a coordinator is to create, manage, and submit your organization’s gift card orders. Whether you're placing a large order to sell on-site at your organization or placing an order for your participants, use these step-by-step instructions to guide you through each of those processes and more.
How to Place a Bulk Order
Bulk orders are large-volume physical gift card orders placed by coordinators for their organization. The gift cards in these orders can be sold by the organization to members of the community, program participants, used as staff gifts, or sold from an inventory in an office or at an event.

Step 1: Log in to your account on RaiseRight.com and navigate to your Coordinator Dashboard. Select Enter Orders.
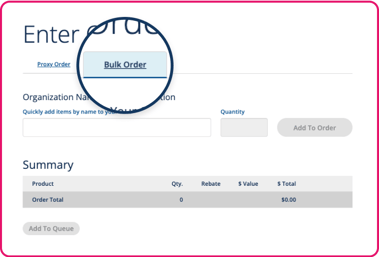
Step 2: Choose the Bulk Order tab.
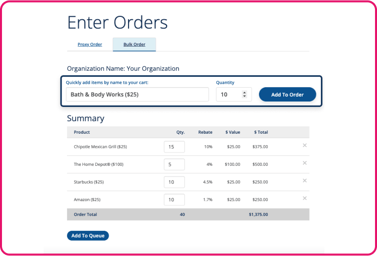
Step 3: Search for items by typing the gift card brand name into the search field. Select the desired item, enter a quantity, then select Add to Order.
Items added to the order populate in the Summary section.

Step 4: Once all items have been added to the Bulk Order, select Add to Queue. Then select Proceed to Queue.
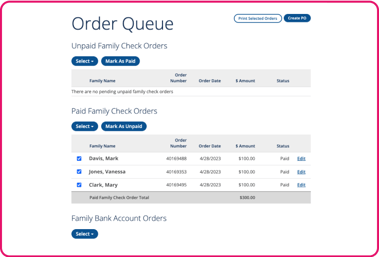
Your Order Queue lists all open orders for your organization categorized by order type. Bulk Orders added to the Order Queue appear under “Organization Bulk Orders.”
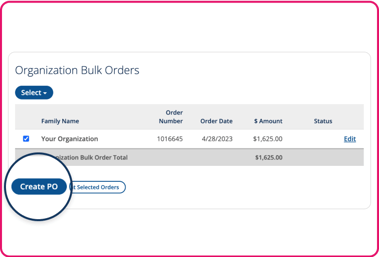
Step 5: To submit the Bulk Order, check the box next to the order in the Order Queue and select Create PO.
The Bulk Order in the Order Queue can be added individually to a PO or combined with other orders in the queue onto one Purchase Order (PO).
Step 6: Submit the PO for processing and fulfillment.
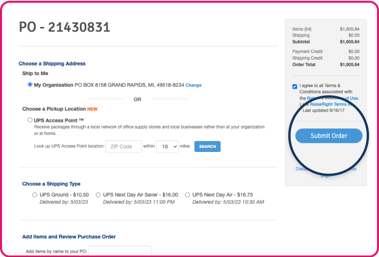
Choose the order shipping address or pickup location, shipping method, and review all order details, then click Submit. For more on POs, visit How to Create and Submit POs.
How do earnings work on Bulk Orders?
When a coordinator places a Bulk Order, the earnings are applied up front on the order total, meaning the gift cards are purchased at a discount (total gift card order value minus total earnings). The organization then sells each gift card at face value and keeps the difference as fundraising earnings. For more on how earnings work, visit our Earnings Distribution page.
How to Place a Proxy Order
Proxy orders are gift card orders that a coordinator places on behalf of a participant. The gifts cards in these orders are requested by specific participants within the organization, who provide their order details to the coordinator via an order form or another preferred method for collecting individual gift card orders. The coordinator then inputs the participant order(s) through their account on RaiseRight.com and submits for processing and fulfillment.

Step 1: Log in to your account on RaiseRight.com and navigate to your Coordinator Dashboard. Select Enter Orders.
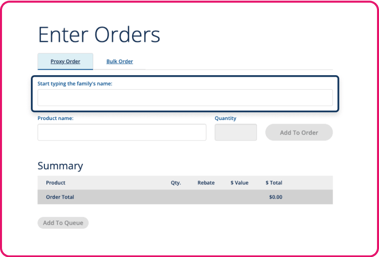
Step 2: Choose the Proxy Order tab and select the participant you are placing the order for.
Proxy Orders can only be placed for participants registered with your organization. Registered participants will appear in a dropdown once you begin entering the participant’s name in the “Start typing family’s name” field. If the participant hasn’t enrolled in your organization, you can create a proxy account by visiting Family Accounts from your Coordinator Dashboard and selecting New Family Account.
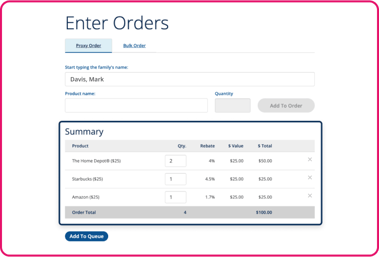
Step 3: Search for items to add to the order by typing the gift card brand name in the Product Name field. Select the desired item, enter the quantity, then select Add to Order.
Items added to the order populate in the Summary section.
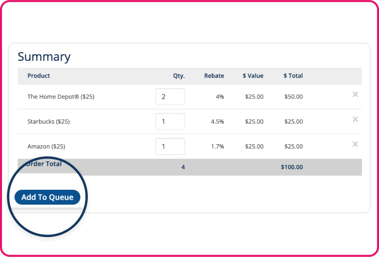
Step 4: Once all items have been added to the Proxy Order, select Add to Queue at the bottom of the page. Then select Proceed to Queue.
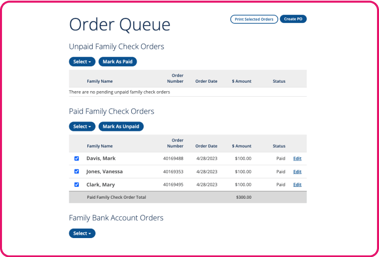
The Order Queue lists all open orders for your organization categorized by order type. Proxy Orders added to the Order Queue will appear under “Unpaid Family Check Orders.” The coordinator is responsible for collecting payment from the participant for the face value of gift cards included on the Proxy Order, at which point the coordinator can “Mark as Paid” and move the order to the “Paid Family Check Orders” category and add to a Purchase Order.
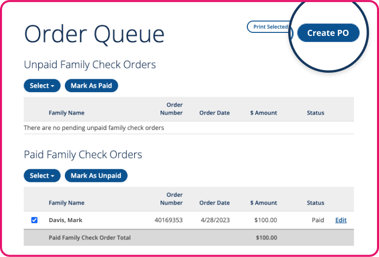
Step 5: To submit the Proxy Order, check the box next to the order in the Order Queue and select Create PO.
The Proxy Order can be added individually to a Purchase Order (PO) or combined with other orders from the queue into one PO.
Step 6: Submit the PO for processing and fulfillment.
Choose the order shipping address or pickup location, shipping method, and review all order details, then click Submit. For more on POs, visit How to Create and Submit POs.
How do earnings work on Proxy Orders?
When a coordinator places a Proxy Order for a participant, the earnings are applied up front on the order total, meaning the gift cards are purchased at a discount (total gift card order value minus total earnings). The participant is responsible for paying the coordinator for the full order amount (the face value of the gift cards in the order), and the organization keeps the difference as earnings. When the order is delivered, the coordinator is responsible for distributing the gift cards to the participant.
How to “Roll Up” Participant Orders from the Order Queue
As participants in your organization shop and place gift card orders through their individual RaiseRight accounts, they can choose to “Pay Coordinator” for the order, and/or “Ship to Coordinator” for any physical gift cards. Participant orders placed using these payment and/or shipping options are added to the coordinator’s Order Queue where they can be managed and “rolled up” (added) to a Purchase Order (PO) by the coordinator.
.png?width=342&height=232&name=STep%201%20Order%20Queue%20(2).png)
Step 1: Log in to your Coordinator Dashboard and select Order Queue.
Or, when there are pending orders from participants, a “Pending Family Orders” notification will appear at the top of the Coordinator Dashboard. Click “Launch” on this notification to go to the Order Queue.
Step 2: Check the box next to any order from the Order Queue that you would like to “roll up” (add) to a Purchase Order (PO) and submit for processing and fulfillment. (Multiple orders can be added to a single PO.) Select Add to PO.
Open orders listed under “Family Bank Account Orders” in the Order Queue have been paid for by the participant via online payments set up through their account. When these orders are added to a PO, a Payment Credit is applied to the order total.

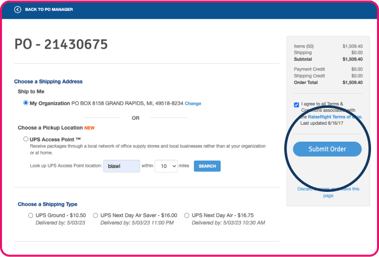
Step 3: Choose the shipping address or pickup location for the PO and review the order summary.
To add items to the order, type the brand name into the “Add items by name to your PO” text field and choose the item(s) to add. Then enter the quantity for each item within the order summary.
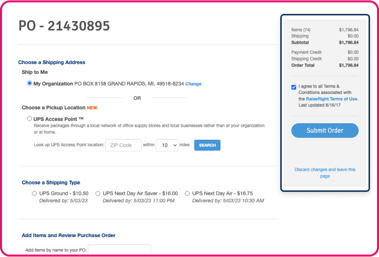
Step 4: Review the order total, including any payment or shipping credits, and agree to the Terms & Conditions. Then select Submit Order to finalize checkout.
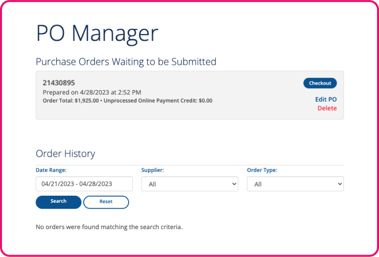
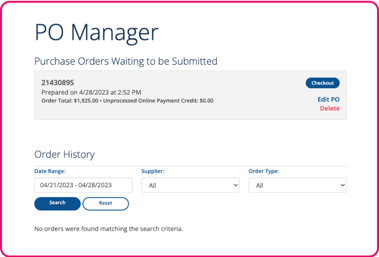
How to Create and Submit a Purchase Order
The Purchase Order (PO) is the final order that gets submitted for processing and fulfillment by RaiseRight. From the Order Queue, coordinators can select any combination of bulk, proxy, and participant orders to add to a PO. Once submitted, the PO can be tracked in the PO Manager on the Coordinator Dashboard.
.png?width=379&height=257&name=STep%201%20Order%20Queue%20(2).png)
Step 1: To create a new PO, log in to your Coordinator Dashboard and select Order Queue.
Or, when there are pending or unsubmitted POs, a “Pending Purchase Orders” notification displays at the top of the Coordinator Dashboard. Click “Launch” on this notification to go to the PO Manager.
Step 2: Check the box next to the order(s) to fulfill, then click Create PO. (If you have any unsubmitted or pending POs, click Add to PO.)
Multiple open orders can be added to a single Purchase Order.
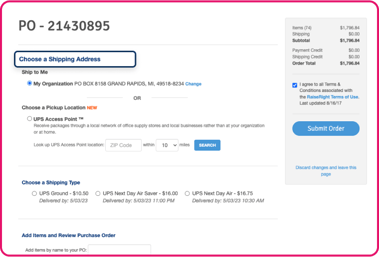
Step 3: Choose the shipping address or pickup location for the order and review the order summary.
To add items to the order, type the brand name into the “Add items by name to your PO” text field and choose the item(s) to add. Then enter the quantity for each item within the order summary.
Step 4: Review the order total, including any payment or shipping credits, and agree to the Terms & Conditions. Then select Submit Order to finalize checkout.